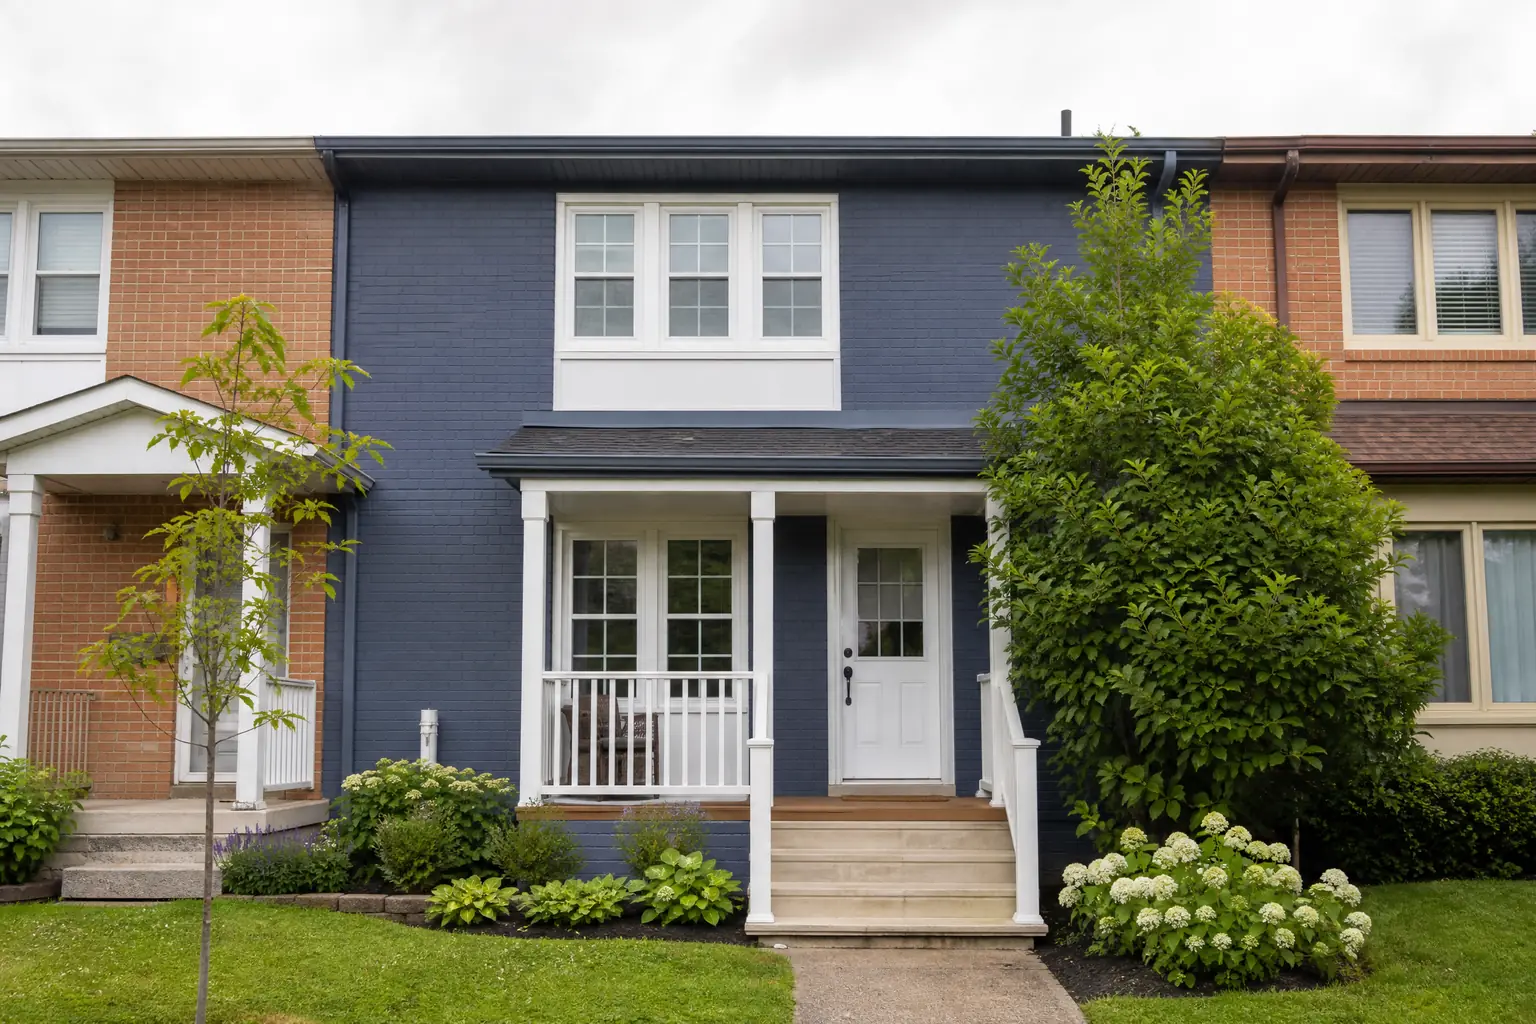

A newer townhouse at the end of a Courtice row
Courtice sits closest to Oshawa within Clarington, and much of it has filled in with new subdivisions. This home is the end unit of a row of freehold townhouses on one of those streets. Like many newer houses, it has brick across the front elevation only, with vinyl siding on the side and rear walls, vinyl windows, an attached garage and a short run of steps with black steel railings.
The brick was the problem. It is a smooth, wire-cut brick in a salmon orange that the owners had never liked. It was in perfect condition, so replacing it made no sense, but repainting it would let the house finally match the slate blue they had pictured since buying it.
Why new brick is not always easy to paint
Older, softer brick soaks up primer readily. Newer brick is the opposite: it is fired hard, dense and smooth, and it absorbs very little. That makes it durable, but it also gives paint less to hold onto. On top of that, this brick still carried traces of construction:
- Mortar smears and small lumps of hardened mortar, called tags, stuck to the brick faces near the joints.
- A faint white bloom of efflorescence across the lower courses, common on new brick as moisture from construction works its way out.
- Weep holes along the bottom course. In brick veneer, these small openings let water that gets behind the brick drain out, and they must never be painted or caulked shut.
The shared wall
The other complication was the neighbour. On a row of townhouses, one brick front meets the next with no break in the wall, and the neighbour’s unit, faced in a tan brick, was staying as it was. Before quoting, the owners spoke with their neighbour, and together we agreed on where the paint would stop: the vertical mortar joint directly behind the downspout that already marks the line between the two units. Ending at a downspout gives a clean, deliberate break rather than a line that looks like the painter ran out of paint.
Prep, step by step
- Removing construction residue. Mortar tags were knocked off with a flat scraper and the smears scrubbed with a stiff nylon brush. Paint over a mortar smear shows as a lump or a different texture, so these were taken back to clean brick.
- Efflorescence. The white bloom was brushed off dry first, so it would not dissolve back into the brick.
- Washing. The brick front was cleaned with a masonry cleaner, scrubbed, and rinsed from an ordinary hose, never a pressure washer, so water would not be driven behind the veneer. It was then left to dry through a run of dry weather.
- Masking. The vinyl windows, the garage door, the front door and the siding where it returns at the corners were masked with film and tape. Masking tape was placed over the weep holes only during cutting-in, then removed straight after each coat so no paint could bridge them.
- Caulking. The sealant between the brick and the window frames had shrunk in places. It was replaced with an exterior sealant compatible with vinyl, so it would move with the window frames through the seasons.
- Protection. Drop sheets covered the steps, the walkway and the small front garden bed, and the shrubs were tied back off the wall.
Primer and paint for dense brick
Primer
We used a masonry bonding primer formulated for dense, low-absorption surfaces. Standard masonry primers rely on soaking into the brick; on hard wire-cut brick they tend to sit on top and can peel. A bonding primer grips the smooth face instead. It was applied with a thick-nap roller and worked into the mortar joints with a stiff brush, then given the drying time on the label before any colour went on.
Why we rolled rather than sprayed
Spraying is fast on brick, but on a townhouse row, overspray can drift onto the neighbour’s brick, a car in the next driveway or a window two doors down. On this job we rolled and brushed. The thick-nap roller covered the brick faces, and a stiff brush was dabbed into the recessed joints so they were filled without leaving bare pinholes. Rolling also lays the paint on with a little more film thickness, which helps on brick that does not absorb much.
Finish coats
Over the primer went two low-sheen coats of acrylic masonry paint, with the second applied after the label’s recoat interval and only on dry days with mild temperatures. We worked from the top down and from the corner toward the downspout, so the final edge at the shared wall was cut in carefully with a brush, keeping the line straight along the vertical joint.
The black railings
The step railings are painted steel, and their factory finish had chipped at the welds and where the posts meet the concrete, with small spots of rust showing. Each spot was wire-brushed to clean metal and spot-primed with a rust-inhibitive primer. The whole railing was then scuff-sanded, wiped down and brushed with two coats of black satin exterior metal enamel. The base plates were caulked where they meet the steps so water cannot pool around the bolts.
Choosing slate blue
The owners had a blue in mind, but blues shift more than most colours outdoors. Our free colour consultation put a few blues from sample pots straight onto the primed brick in a small area near the garage: a light powder blue, a mid slate blue and a deep navy. They looked at them first in the morning, when the front of the house is in sun, and again in the evening, when it falls into shade.
The powder blue looked washed out in full sun. The navy looked almost black in the evening shade and made the windows feel small. The deep slate blue stayed clearly blue in both lights, with enough grey in it to keep it from looking bright, and works well with the white vinyl windows, the grey garage door and the black railings. It also sits comfortably next to the neighbour’s tan brick, which mattered on a shared row.
Keeping the site in order
Every evening the drop sheets were folded, the walkway swept, masking checked and re-pressed where it had lifted, and the steps cleared so the family could come and go. Rollers and brushes were cleaned off site. On the last visit all the masking came off, the windows were cleaned where needed, the shrubs were untied and the weep holes were checked once more.
The finished front and what to look after
The front of the house is now an even slate blue from the foundation to the soffit, with the texture of the brick and the line of every mortar joint still visible. The black railings are crisp again, and the paint stops neatly at the downspout where the neighbour’s brick begins.
- Keep the weep holes open. If mulch or soil builds up against the bottom course, clear it.
- Rinse the brick gently with a hose once a year to remove road dust; skip the pressure washer.
- Touch up chips on the railings quickly, since bare steel rusts fast. The labelled black enamel and primer were left in the garage with the slate blue.
- Watch the caulk at the window frames; it is the most likely place for water to get behind the brick.
Why this suits newer Clarington homes
Courtice and the newer parts of Bowmanville have plenty of homes with brick fronts in colours that were chosen by the builder, not the owner. Painting dense new brick works well, provided the primer is chosen for that surface, the weep holes are respected and the shared walls on townhouses and semis are planned with the neighbours. Our exterior brick painting covers these newer homes as well as the heritage brick in Bowmanville and Orono, and our Clarington page has more on the housing across the municipality. We take on brick and exterior work across Durham Region. If your brick colour has never felt like yours, tell us about your house, and we will put the cleaning, primer, paint and railings on a written, itemized quote.