
A brown bungalow in the countryside
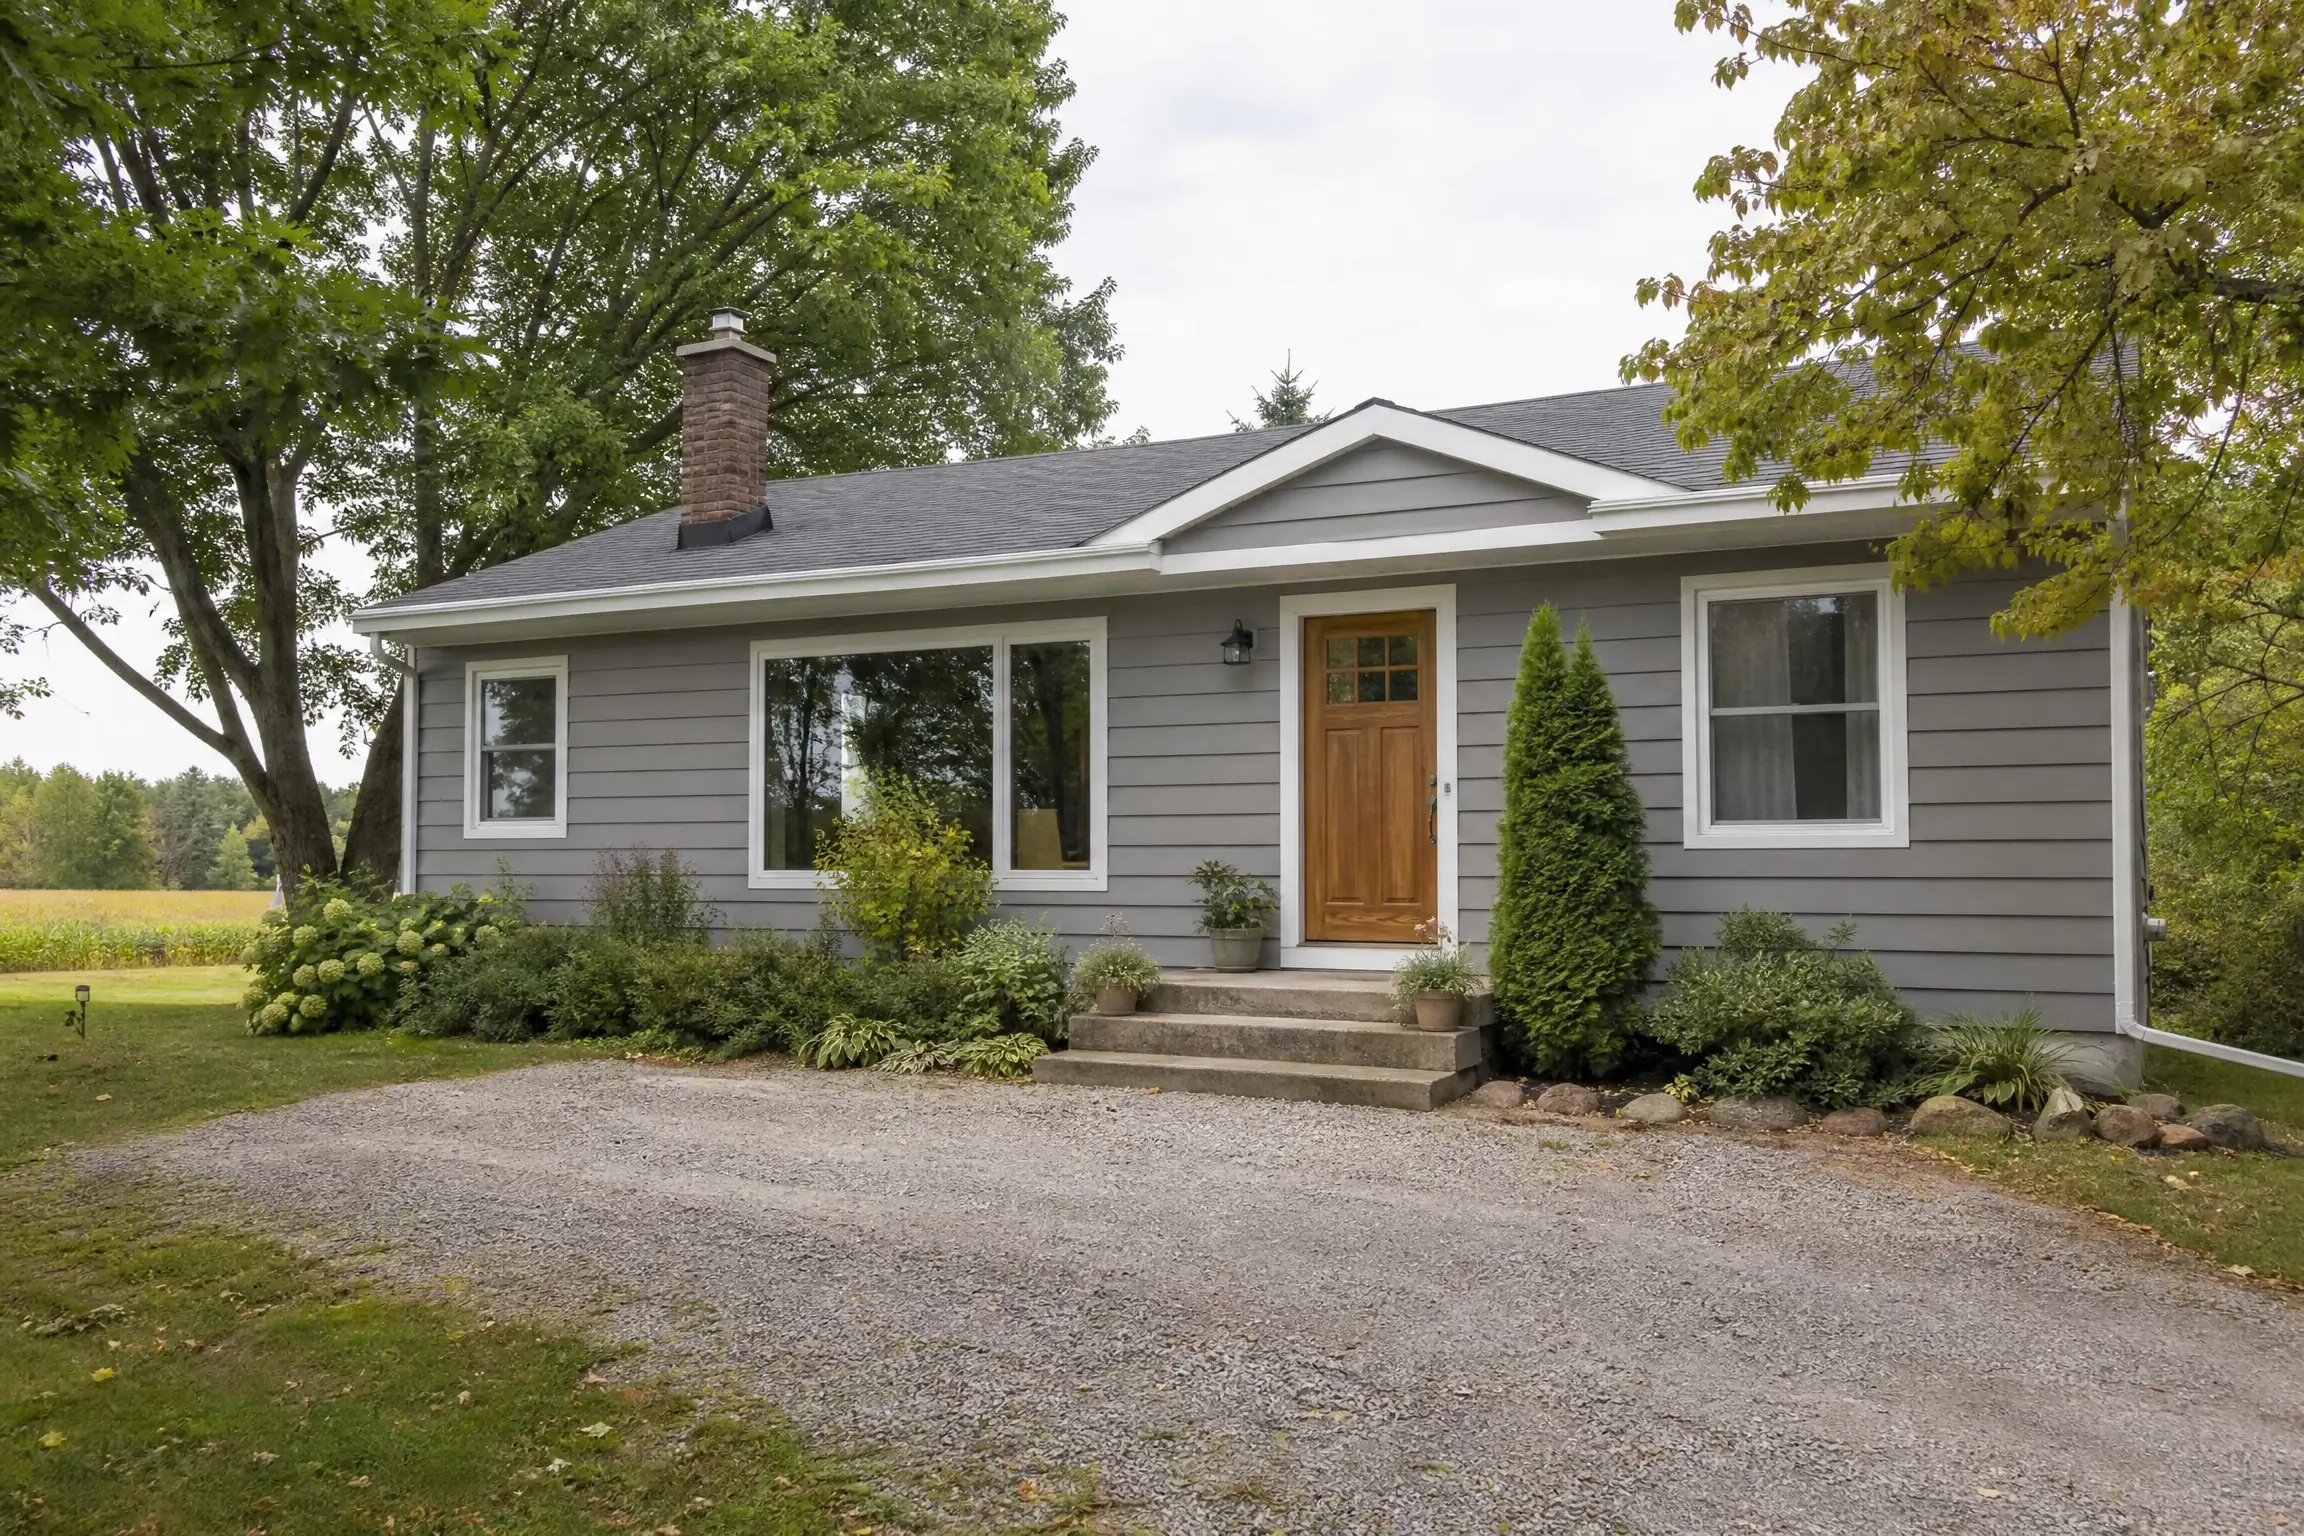
This long, low bungalow sits on a country lot outside Gormley, in the rural west of Whitchurch-Stouffville, with fields beyond the backyard and a gravel drive running up from the road. The walls are clad in horizontal aluminum siding above a stone-faced foundation, and every other piece of trim on the house is aluminum too: vented soffits, fascia, eavestroughs, downspouts and the capping wrapped around each window frame. All of it was the same chocolate brown.
The owners found the house dark and heavy, especially under the deep roof overhangs. They wanted grey siding and white trim, for a lighter look that would sit well with the stone and the open land around it, without replacing the cladding.
Condition of the metal and the main challenges
The siding was sound: straight, tightly fastened and free of corrosion. The factory finish had faded and chalked on the south and west walls, where the brown had turned a dusty milk-chocolate shade, but on the north side under the eaves it was still close to its original depth.
Several things made this more involved than a same-colour refresh:
- A large colour change. Going from dark brown to a mid grey means the old colour must be fully hidden. Any thin spot shows as a brown shadow.
- Vented soffits. The soffit panels are perforated to let air into the attic. Paint applied heavily would fill the holes and reduce that air flow.
- Many small parts. Eavestroughs, downspouts, fascia and window capping each have different shapes and finishes, and each had to go from brown to white.
The caulk where the window capping meets the frames had also dried and split, letting water in behind the capping on some windows.
Preparing every aluminum surface
Protection
The stone foundation was covered with plastic and paper up to the siding line, and the windows and doors were masked with film. Because the soffits and fascia would be sprayed, the edge of the roof shingles was masked as well. Garden beds against the house were covered with drop cloths, and the owners’ vehicles were parked away from the house on spraying days.
Cleaning
All siding, soffits, fascia and eavestrough faces were washed using a metal-safe exterior cleaner and soft brushes, then rinsed off with the hose pointed downward. On a rural lot, the soffits had collected cobwebs, insect nests and dust in their vents, and these were brushed out of the perforations before washing. Once dry, a dark cloth wiped across each wall came away clean, so the chalk was gone.
Scuffing
The fascia and the eavestrough faces had kept a smooth, glossy finish that primer can struggle to bite into, so they were scuffed lightly with fine non-woven pads. The siding, with its chalky faded finish now cleaned, needed only spot scuffing where it was still glossy.
Caulking
Split caulk around the window capping was cut out, the joints were cleaned and dried, and new paintable sealant was laid in. Gaps where siding meets the capping and the corner posts were sealed, while the horizontal panel laps were left free to drain.
Priming
Every brown surface received a full coat of bonding primer made for coated aluminum. For the siding, we had the primer tinted grey, close to the finish colour, so the two finish coats would hide the brown completely instead of fighting it. The trim and soffits were primed in white.
Applying the new colours
Siding
An airless sprayer laid the paint onto the siding panels, and a second painter back-rolled each run right away with a short-nap roller, which presses the paint into the panel surface and evens out the film. The bottom lip of each panel was brushed. Slate grey in a low sheen was applied twice, with the full recoat interval observed between coats. On this open lot, wind was the main constraint, so spraying was limited to calm mornings, and on breezy days the work switched to brushing trim.
Vented soffits
The soffits were sprayed in white with a fine-finish tip, in several light passes rather than one heavy one, so paint coated the panel without bridging the perforations. After each coat, a few sections were checked against the light to make sure the holes were still open. Two coats were applied in total.
Fascia, eavestroughs, downspouts and capping
These were painted white semi-gloss, two coats each, mostly by brush. Only the outside faces of the eavestroughs were painted; the insides were left as they were, since paint inside a gutter only peels in standing water. Downspouts were painted in place, front and sides, with the back faces reached as far as the brackets allowed.
Choosing the grey
Greys shift a great deal depending on light and surroundings, and next to fieldstone and green fields they can turn blue, green or beige. A range of greys came to the free colour consultation as sample pots, from a light dove to a deep charcoal, and painted each on a primed panel beside a white sample, held against the stone. The owners looked at them early in the day and again in the late afternoon. The dove washed out in full sun, and the charcoal felt as heavy as the brown had. A slate grey with a slight blue undertone stayed clear and calm in both lights and picked up the cooler tones in the stone.
The bungalow now has slate grey walls under bright white soffits and fascia, with white eavestroughs and capping drawing clean lines along the roof and around every window.
Tidy each day on a country lot
Each evening the masking was checked and re-taped where the wind had lifted it, the sprayer was cleaned and packed into the garage, and ladders were laid flat along the house. Brushed-out debris from the soffits was swept from the drop cloths and bagged. On the final day all the plastic and paper came off, the stone was checked for any overspray, and the gravel drive was raked where drop cloths had been weighted down.
Keeping painted aluminum trim in shape
- Clean the eavestroughs every fall so water does not overflow onto the new white fascia and leave streaks.
- Give the walls a yearly rinse, and go over the lower panels with a soft brush where dust from the gravel drive settles.
- If the soffit vents ever need cleaning, use a soft brush rather than a pressure washer.
- Check the caulk around the window capping each spring and reseal any small cracks.
- Touch-up paint in slate grey and the whites is stored on a garage shelf, each lid marked with its formula.
Why this works for rural homes in Whitchurch-Stouffville
Older homes around Gormley, Vandorf and Stouffville’s Main Street often have aluminum siding and trim in colours that were popular when they were built. Painting lets the owners change the whole look, siding, soffits and eavestroughs together, while keeping cladding that is still in good condition. The open, windy lots here call for careful timing when spraying, and vented soffits call for a light hand. You can read more about our aluminum siding painting on homes like this, which we carry out across York Region. Since 2010 our painters have worked on houses from the city out into the countryside, and no surface leaves our hands with fewer than two finish coats.
If your siding and trim are a colour you are ready to leave behind, book a quote visit with us; we will look at each surface and itemize the work in writing.